Developer Documentation
The following section provides detailed information on the the software architecture and on the possibilities to extend ESBO-ETC. The source code of ESBO-ETC and this documentation can be found on the IRS Gitea-server.
Note
In the following, methods of the source code may be mentioned without any details on the required parameters or the return values. Please refer to the API Documentation for further information.
ESBO-ETC uses Astropy Quantities for all computations in order to ensure proper unit conversion.
Project Structure
This project is structured into several folders as shown below. The three main folders are docs, which contains the documentation,
esbo_etc containing all source files and tests, where all tests are located.
root
├── docs                        Documentation files
│   └── source                  Source files of the documentation
│       ├── configuration       Configuration chapter of the documentation
│       ├── developer           Developer chapter of the documentation
│       └── usage               Usage chapter of the documentation
├── esbo_etc                    Source code of ESBO-ETC
│   ├── classes                 Contains all classes of the source code
│   │   ├── optical_component   Contains all class files of the optical components
│   │   ├── psf                 Contains all class files to model the different types of PSF
│   │   ├── sensor              Contains all class files of the sensors
│   │   └── target              Contains all class files of the targets
│   ├── lib                     Contains all library functions
│   └── esbo-etc.py             This is the main file to run the application
└──  tests                      Contains all tests
    ├── data                    Necessary data for all tests
    ├── optical_component       Tests of the optical components
    ├── psf                     Tests of the different PSF implementations
    ├── sensor                  Tests of all sensors
    └── target                  Tests of all targets
ESBO-ETC Python module
ESBO-ETC is designed to be included as module in other Python scripts.
This is possible by importing the class esbo_etc from the module esbo_etc as shown below.
1 | from esbo_etc import esbo_etc
|
The class esbo_etc requires a path to the configuration file as initialization argument and some other optional paramaters.
The created object offers the method run() to trigger the computation.
The result of the computation is returned as Astropy quantity.
A Minimal example looks as follows:
1 2 3 4 5 6 7 8 9 10 | from esbo_etc import esbo_etc
# Initialize a new ESBO-ETC object
etc = esbo_etc("path_to_configuration_file.xml")
# Run the calculations
res = etc.run()
print(res)
|
Software Architecture
For modelling the radiation transportation, the decorator pattern was used as shown in the figure below.

The decorator pattern used for the radiation transportation.
The radiation transportation pipeline consists always of a single target emitting the signal radiation. This target may be encapsulated by multiple optical components which manipulate the radiation by either adding their own background radiation or by decreasing the transmitted radiation. The outermost part of the radiation transportation pipeline is formed by some kind of sensor component, detecting the radiation. The quality of the detected signal can then be determined by calculating the signal to noise ration (SNR).
Class diagram of the software architecture.
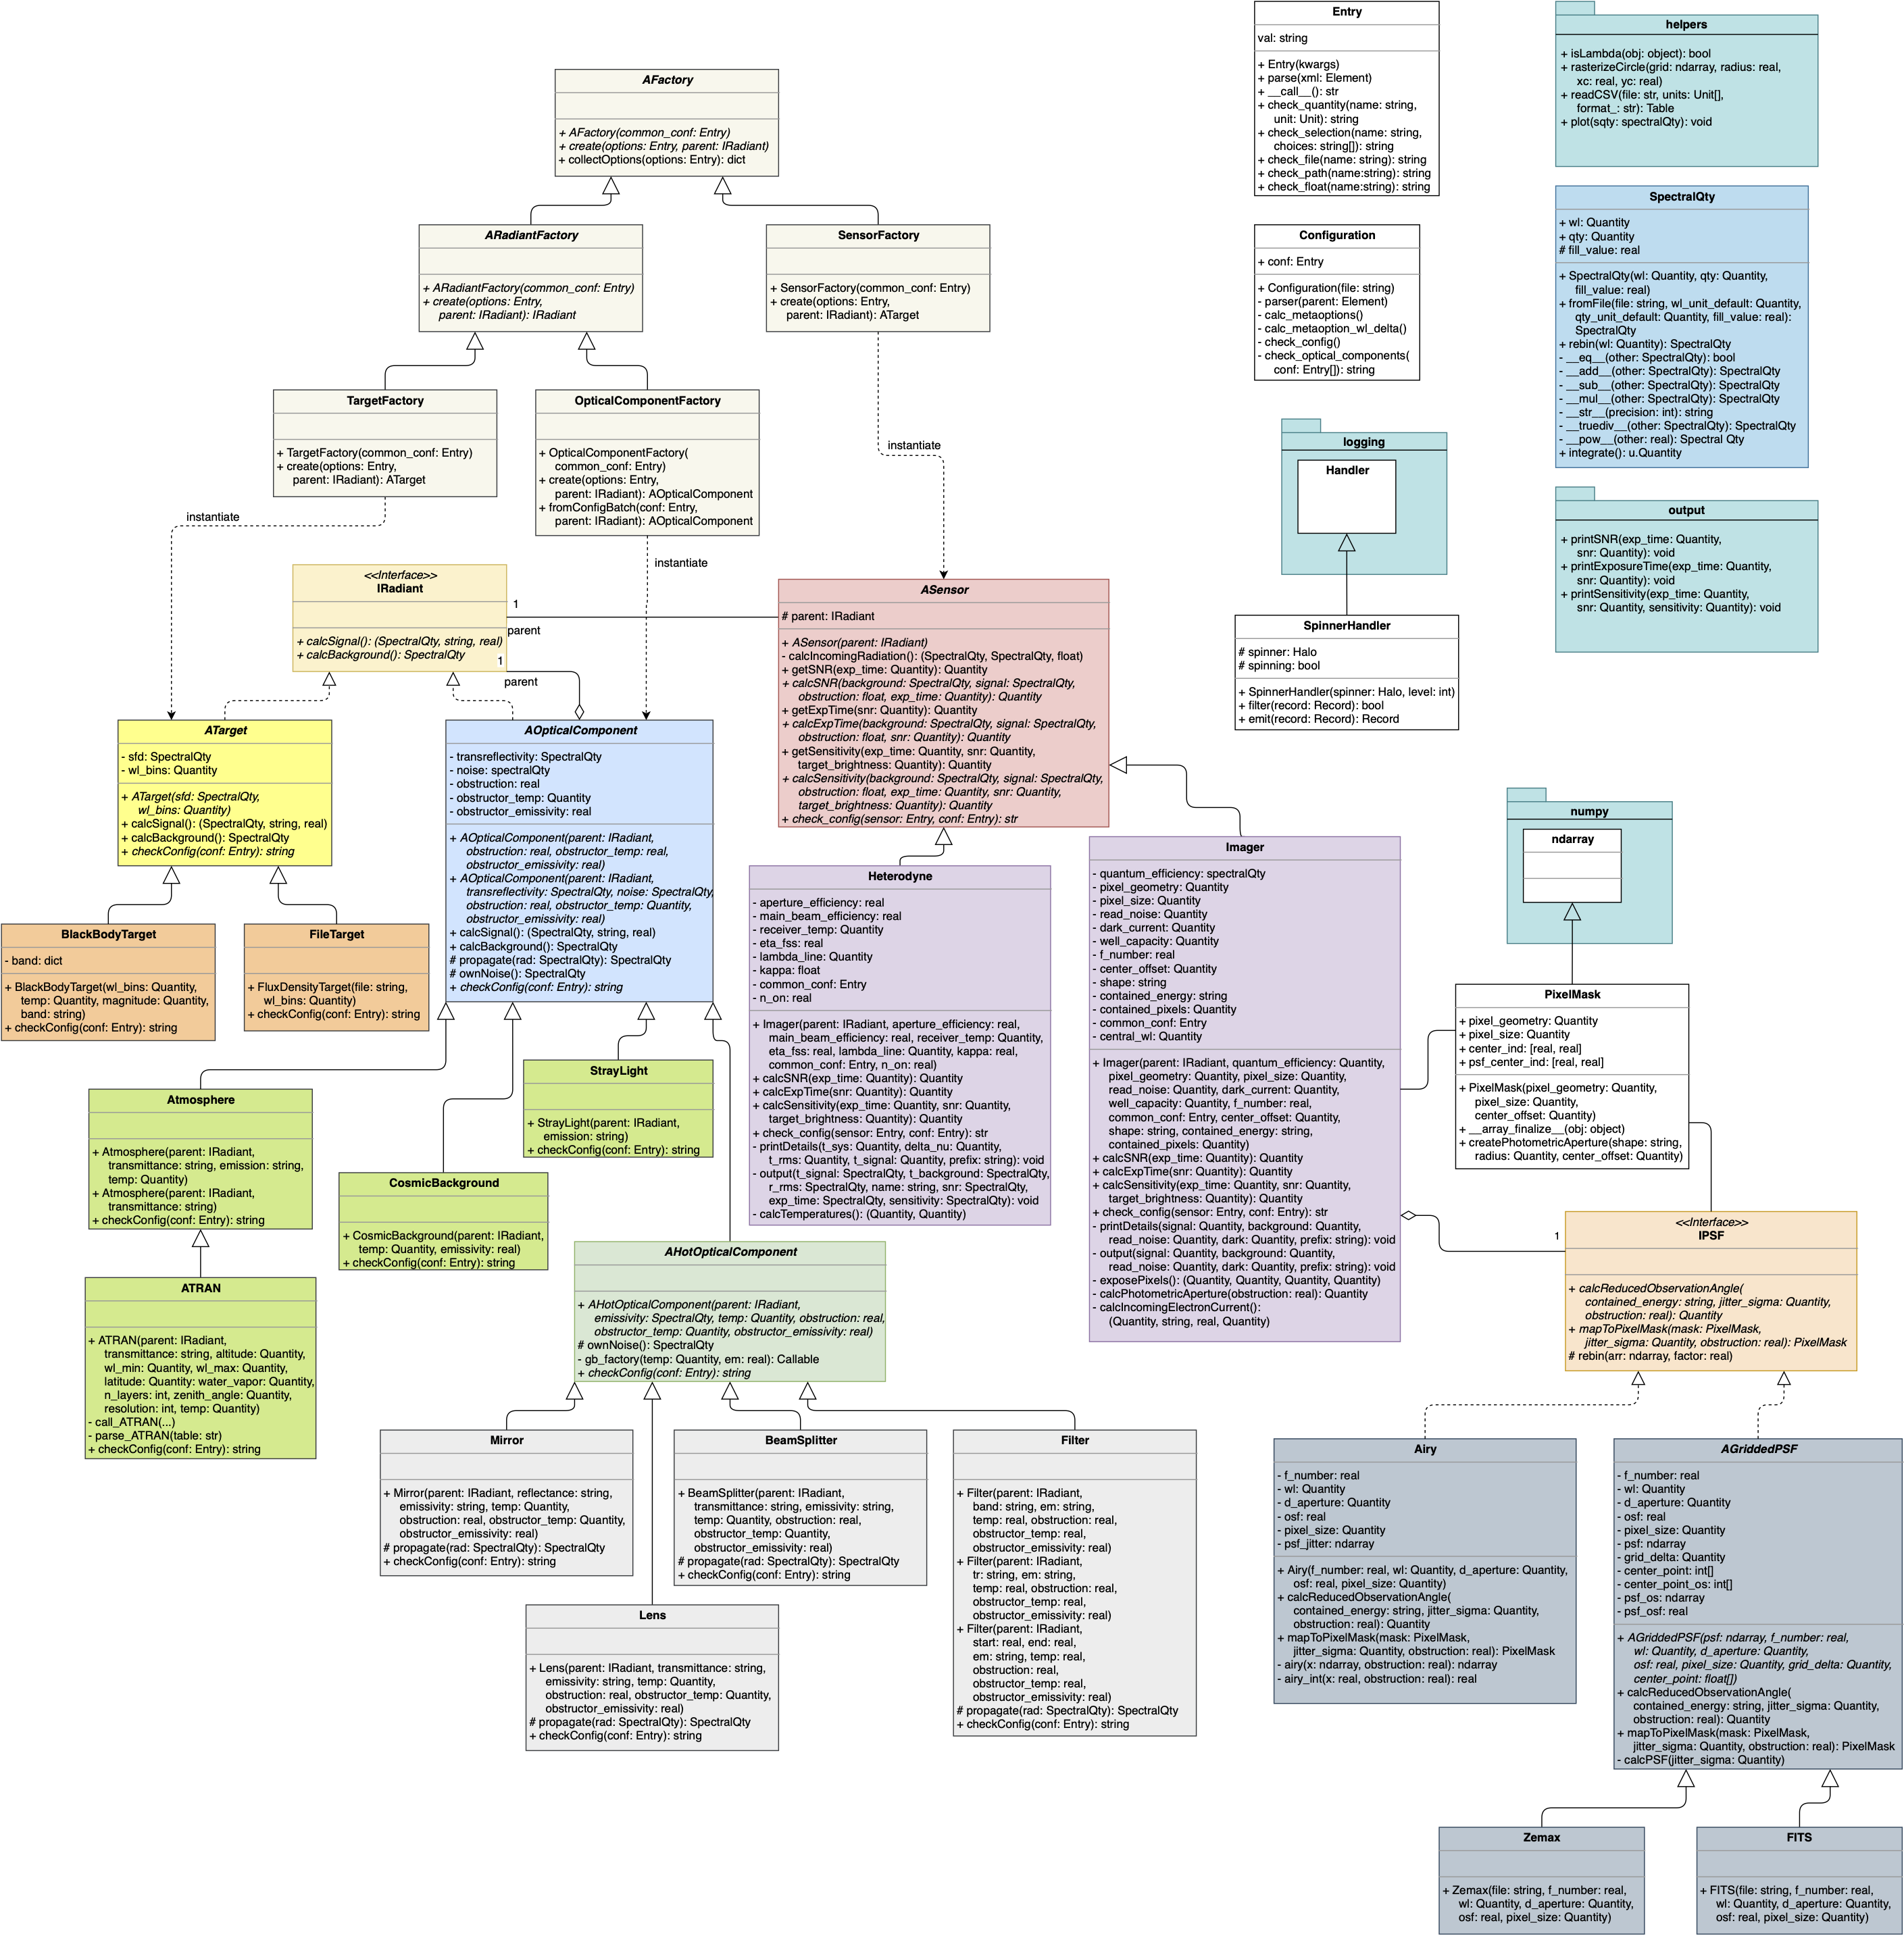
Radiant Interface
Class diagram of the interface IRadiant.
In order to implement the aforementioned radiation transportation pipeline, a sophisticated software architecture has been designed.
As shown in the class diagram, the class IRadiant forms the backbone of the structure.
This interface class defines the two methods calcSignal() and calcBackground() and therefore the basic layout of all decorated classes.
All targets and optical components implement this interface in oder to allow the cascading calculation of the signal and background fluxes.
For both targets and optical components exists an abstract superclass which implements the required interface. This allows the actual
classes to focus on the initialization and calculation of their own properties, ignoring the implementation of the interface.
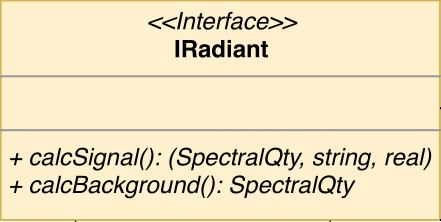
Target
Class diagram of the target classes.
The abstract class ATarget implements the interface provided by IRadiant and provides the abstract method checkConfig() which is used to check the relevant parts of the configuration file for this component.
All available target types must inherit from ATarget and therefore must implement the method checkConfig().
As the superclass ATarget implements the interface provided by IRadiant, the compatibility to the radiation transportation pipeline is ensured.
All subclasses therefore only set up a SpectralQty-object containing the emitted radiation and call the constructor of ATarget.
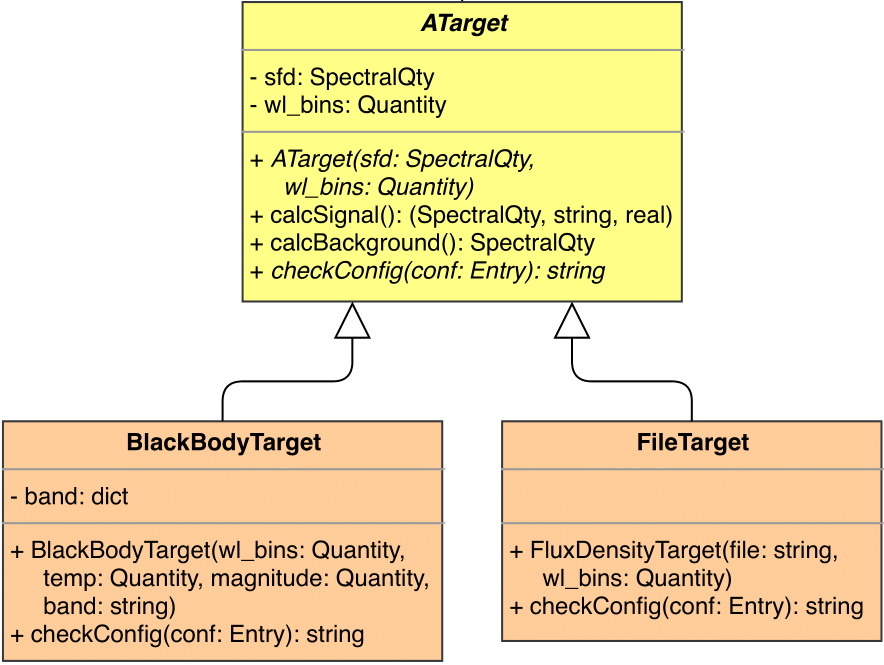
Optical Component
Class diagram of the optical components.
The abstract class AOpticalComponent implements the interface provided by IRadiant and thereby the two methods calcSignal() and calcBackground().
This includes the treatment of central obstruction of the components as well as transmittance / reflectance coefficients.
Additionally, AOpticalComponent provides the two methods propagate() for handling the propagation of incoming radiation through the optical component and ownNoise() for calculating the background radiation contribution of this component.
The two function may be overwritten by the subclasses, if a custom implementation is necessary.
Otherwise, the parameters transreflectivity and noise of the constructor method will be used for the calculations.
In order to check the relevant parts of the configuration file for this component, the class provides the abstract method checkConfig() which has to be implement by all subclasses.
According to the restrictions above, subclasses of AOpticalComponent can be implemented in two possible ways: either by providing the parameters transreflectivity and noise to the constructor of the superclass or by implementing the two methods propagate() and ownNoise().
Hot Optical Component

Class diagram of the hot optical components.
The abstract class AHotOpticalComponent extends the abstract superclass AOpticalComponent by implementing the method ownNoise() assuming grey body radiation in order to model optical components with a thermal background contribution.
This has the consequence, that every subclass of AHotOpticalComponent must implement the method propagate(), which handles to propagation of the signal and background radiation through the component.
Like AOpticalComponent, the class AHotOpticalComponent provides the abstract method checkConfig() for checking the configuration file.
Sensor
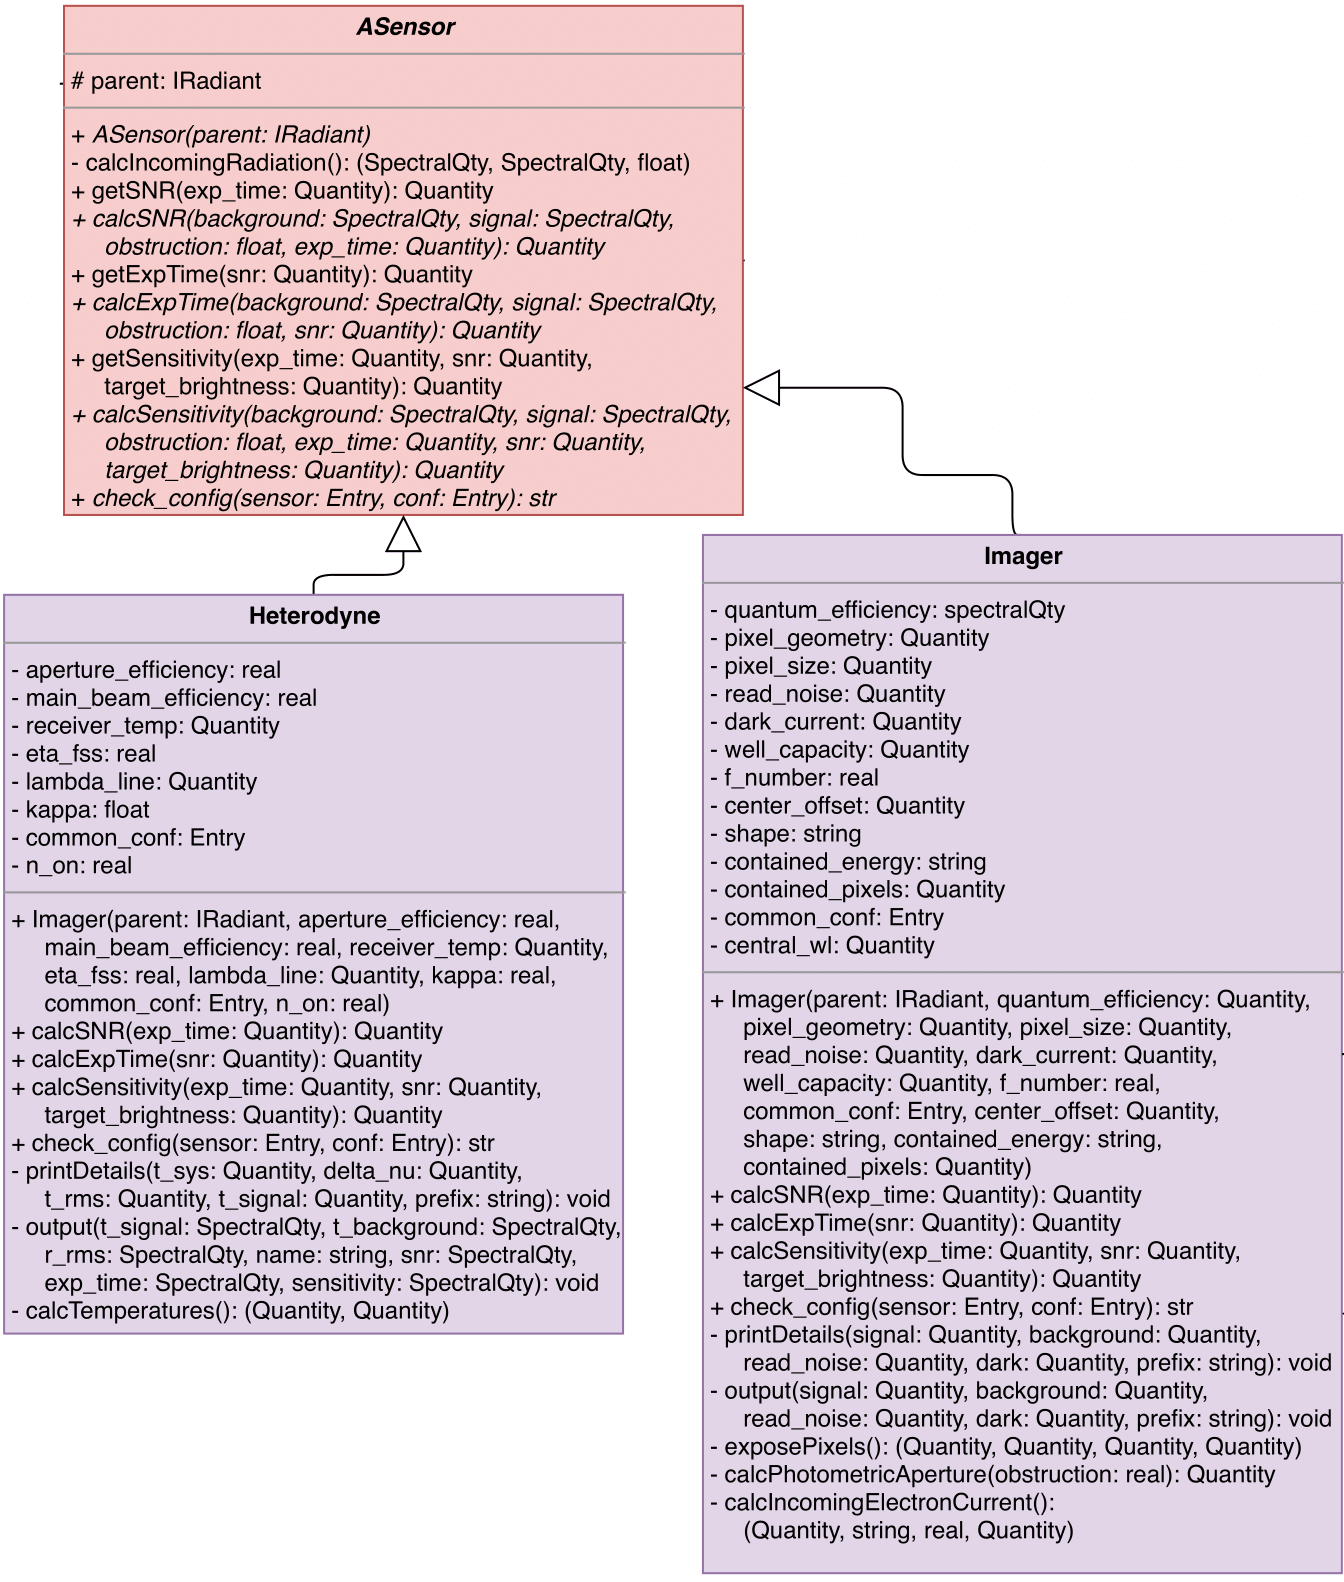
Class diagram of the sensor components.
The abstract class ASensor is the superclass that must be subclassed by every sensor class.
It provides the three abstract methods calcSNR(), calcExpTime() and calSensitivity() which must be implemented by the subclasses.
These three abstract methods act as interface for the processing and evaluation of the incoming radiation in the detector.
getSNR(), getExpTime() and getSensitivity() are called by the main application to trigger the evaluation of the radiation transportation pipeline and the subsequent calculation of the desired quantity.
Additionally, ASensor defines the abstract method checkConfig() to allow the check of the sensor-configuration.
PSF
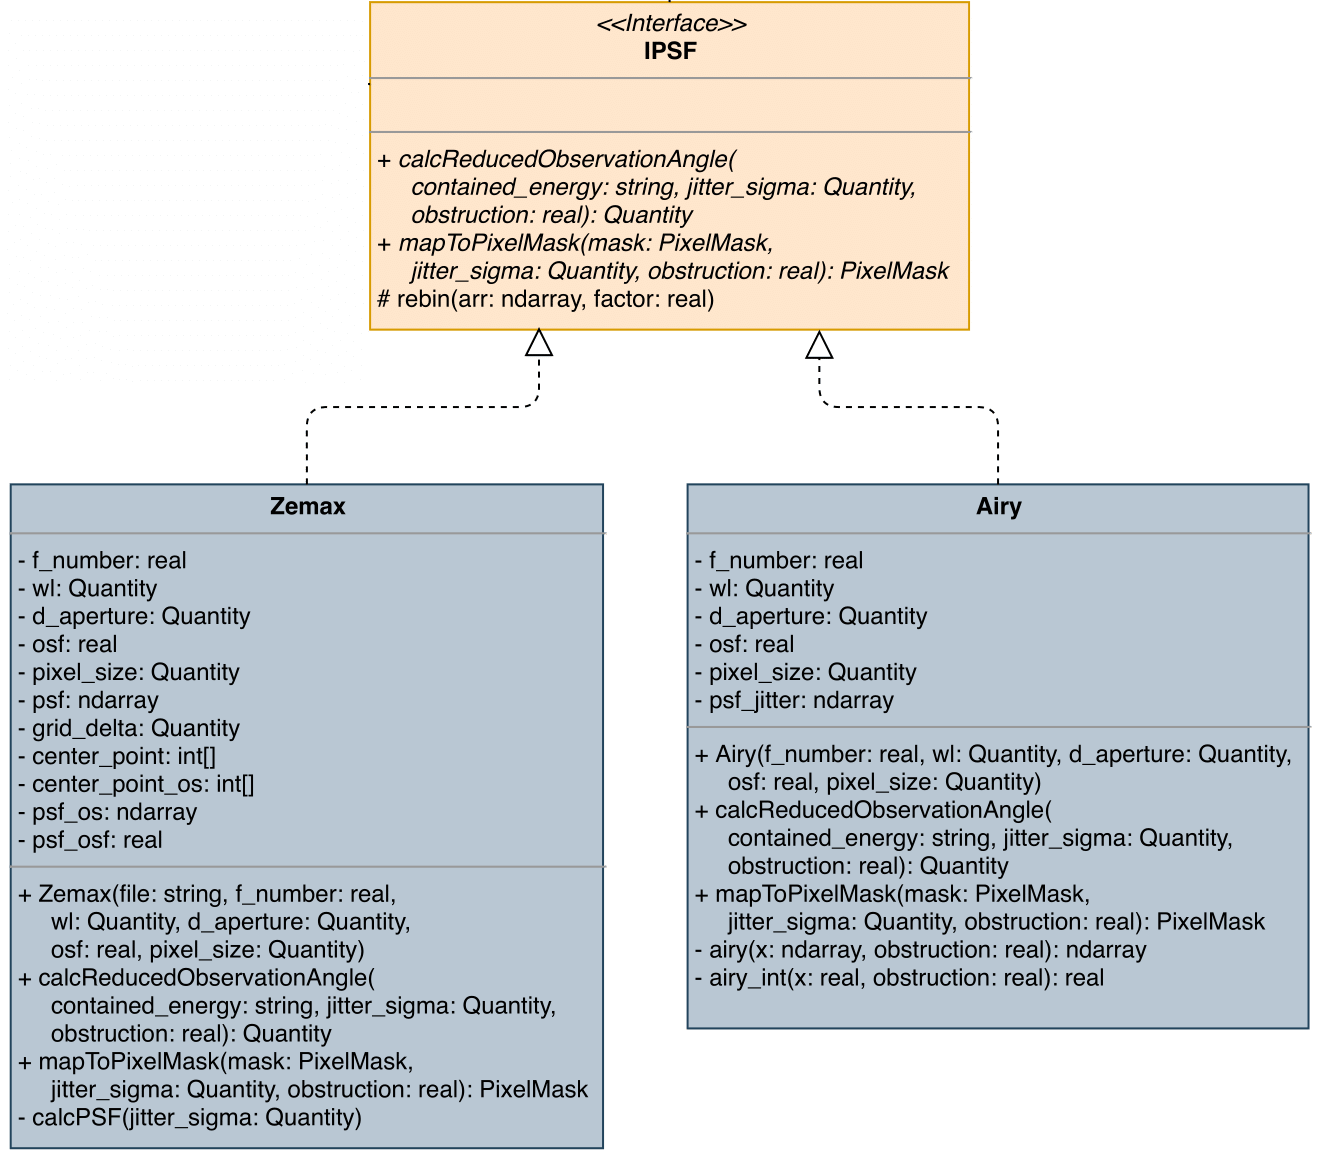
Class diagram of the PSF classes.
For modelling the diffraction behaviour of the telescope, the interface IPSF defines the necessary methods.
Currently, two different implementations of PSFs are available: the class Airy allows to model the PSF as an airy disk, whereas the class Zemax allows to use a PSF calculated by the software Zemax.
Both classes allow the computation of the reduced observation angle for a given encircled energy and the mapping of the PSF onto an pixel grid.
Factories
In order to instantiate the corresponding objects from the configuration file, the factory method pattern was used. The following factory methods are responsible for transforming the parsed configuration into the cascaded radiation transportation pipeline.
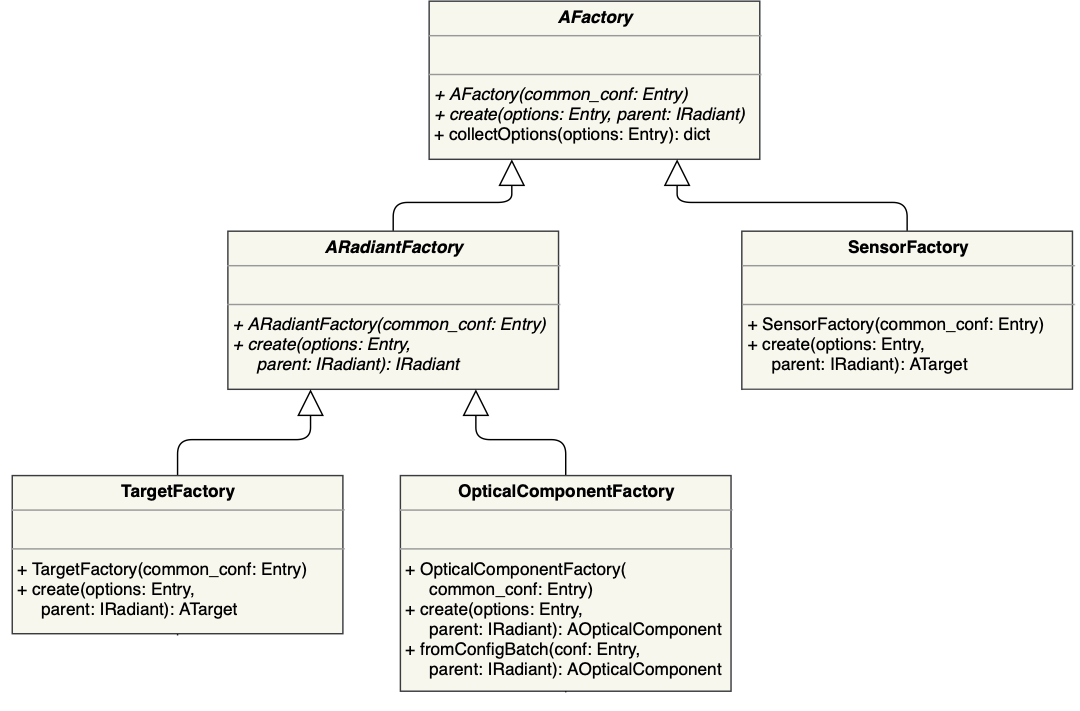
Class diagram of the factories.
The abstract superclass AFactory provides the abstract method create() to create any target, optical component and detector object.
Additionally, the method collectOptions() allows to collect all options from the parsed configuration as dictionary for the constructor call of the corresponding class.
The class TargetFactory is responsible for the instantiation of all subclasses of ATarget.
In contrast, the class OpticalComponentFactory handles the creation of all subclasses of AOpticalComponent.
It provides the method fromConfigBatch to set up a batch of optical components.
Finally, the class SensorFactory is responsible for the instantiation of all subclasses of ASensor.
Other Classes
In the following, the most important classes that are used by the software but not part of the radiation transportation pipeline are explained.
Spectral Quantity
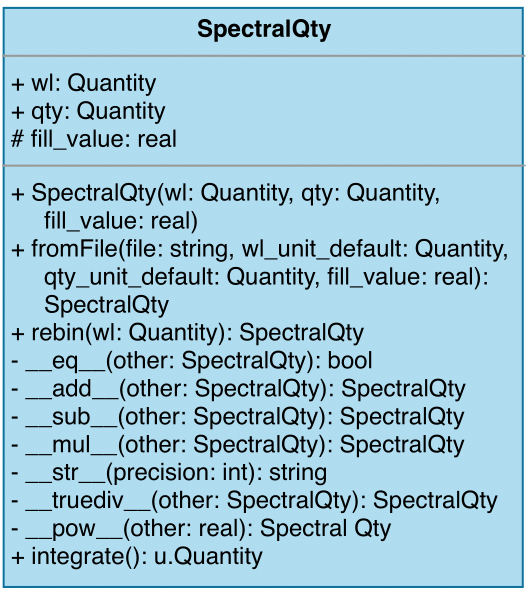
Class diagram of the Spectral Quantity.
All spectral quantities used for calculations, e.g. spectral flux densities, spectral reflectances, etc., are handled as SpectralQty-objects.
They can be set up either by providing the two arrays wavelength bins and the corresponding spectral quantity as parameters to the constructor or by reading them from a file using the class method fromFile().
In the latter case, the file must be readable by astropy and the units of the columns may be contained in the column header in square brackets.
SpectralQty-objects natively support mathematical operations like addition (__add__()), substraction (__sub__()), multiplication (__mul__()) as well as true division (__truediv__()) and comparison (__eq__()).
These operations are defined for several other objects like SpectralQty, int, float as well as Lambda-functions.
Additionally, the two methods rebin() and integrate() allow to change the spectral grid or integrate the quantity on the grid.
Configuration
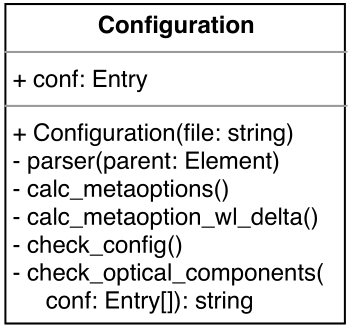
Class diagram of the Configuration.
The class Configuration contains all methods necessary to parse the XML-configuration file and convert it into a tree of Entry-objects.
This conversion is triggered in the beginning of the program flow.
Additionally, the check of the parsed configuration is preformed by this class (check_config(), check_optical_components()).
In detail, the static checkConfig()-method of the corresponding class is called on each Entry-object to perform the checks.
Finally, this class also computes some meta options like the array containing the wavelength bins.
Entry
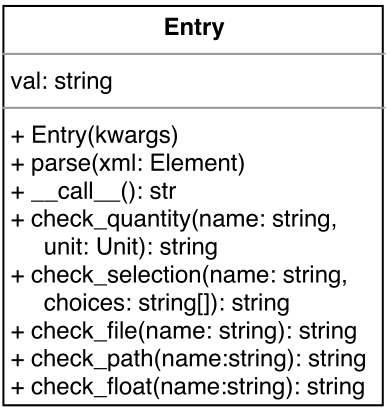
Class diagram of the Entry.
The class Entry is used to represent the tags of the XML-configuration file and provide basic test mechanisms.
Each XML-tag is parsed by the Configuration and converted into an Entry-object.
Thereby each attribute of the XML-tag is converted into an attribute of the corresponding Entry-object.
In case another attribute with the same name and the postfix _unit exists, both attributes are converted to an Astropy-Quantity object.
In case a parameter is called val, this parameter is returned if the Entry-object is called.
In order to allow checks on the attributes of an Entry-object, the methods check_quantity(), check_selection(), check_file(), check_path() and check_float() take the attribute name and possible a default value and return a string as check result.
If the check is passed, None will be returned.
Extending ESBO-ETC
ESBO-ETC can be easily extended by adding new targets, new optical components or a new detector component. In the following, only the minimal required changes in the source code are described. Of course, the documentation must be edited as well if new components are added and corresponding build tests should be defined. Before any changes can be committed to the repository, the developer must ensure that all build tests pass. The build tests can be started by running
1 | venv/bin/python3 -m unittest discover tests
|
in the console in the project’s root directory.
Adding Targets
Adding a new target type to ESBO-ETC is the easiest extension.
In the first place, the new target component must be defined in a new file classes-folder.
Thereby, the new component must subclass ATarget in order to be decoratable by other optical components.
The class must provide a constructor which accepts all attributes of the configuration tag as parameters and initializes the superclass passing the emitted radiation as parameter.
Additionally, the class must implement the method checkConfig() in order to check the configuration.
In case of an configuration error, the method must return the corresponding error message.
Optionally, the factory method create() of the class TargetFactory has to be modified, if the constructor of the new component requires more parameters than the configuration tag attributes.
Adding Optical Components
Extending ESBO-ETC by a new optical component consists of two tasks.
First of all, the new optical component class has to be implemented in a separate file in the classes-folder.
The new class must inherit from the abstract class AOpticalComponent or, in case of an optical component with thermal emission, from the abstract class AHotOpticalComponent and implement all abstract methods.
In case of a cold optical component, the new class must implement the method checkConfig() and call the constructor of the super class.
In case of a hot optical component, the new class must implement the method checkConfig() as well as the method propagate() and call the constructor of the super class.
The method checkConfig() is used for checking the XML-configuration file and accepts as parameter the corresponding part of the configuration as Entry-object.
In case of an configuration error, the method must return the corresponding error message.
The method propagate() is used to model the propagation of incoming radiation through the optical component.
Therefore, this method receives as parameter the incoming radiation as SpectralQty-object and must return the manipulated radiation as SpectralQty-object.
The optional second task consists of modifying the factory method create() of the class OpticalComponentFactory in order to properly initialize the new optical component from the configuration.
This is only necessary if the new optical component needs additional parameters besides the attributes of the corresponding configuration tag.
Adding Detector Components
In order to add a new detector component, two tasks must be completed.
The new detector component must be implemented in a designated file in the classes-folder, subclassing ASensor.
Thereby, the new class must implement the three methods calcSNR(), calcExpTime() and calcSensitivity().
All three methods obtain the incoming background and signal radiation as well as the obstruction factor as parameters apart from some specific parameters and must return the corresponding calculated value.
Additionally, all three methods must be able to calculate multiple SNRs, exposure times or sensitivities at once if an array of specific parameters is provided.
Besides the implementation of the detector, the factory method create() of the class SensorFactory can be modified.
CI/CD-Pipeline
Each push to the ESBO-ETC Repository triggers a Jenkins CI/CD-pipeline on the ESBO-DS VM. This pipeline first executes all unittests to ensure the prober functioning of the code. Afterwards this documentation is being built and deployed to the webroot of ESBO-DS’ webserver. All these build steps are defined within a Jenkins-file in the root of the repository. The complete CI/CD set up is shown in the following figure.
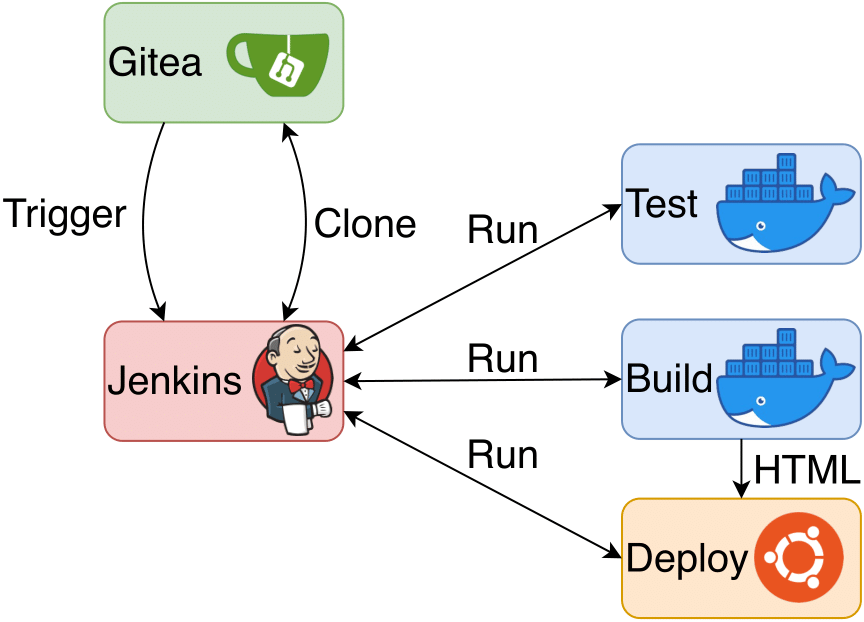
CI/CD configuration.
Jenkins Configuration
In Jenkins the pipeline ESBO-ETC is defined and configured to read all sources including the Jenkins-file from the ESBO-ETC repository in Gitea. Additionally, a webhook is set up and included in Gitea to trigger the pipeline after each push to the repository. After the pipeline has been triggered, Jenkins clones the repository and executes the contained Jenkins-file.
Pipeline
The pipeline is divided into three steps:
Test: A docker image containing a complete python installation and a virtual environment is built using the Dockerfile in the root of the repo. Afterwards all required python modules (see
requirements.txt) are being installed in the container and the unittests defined intestsexecuted. If all tests pass, the pipeline continues with stage 2.Build Docs: The documentation is being build using the previous docker image. After all required python modules have been installed, the build process using sphinx is started. The results of the build process (all website files) are archived (stashed) for the next stage of the pipeline as shown in the image above.
Deploy Docs: The last stage of the pipeline is run locally on the ESBO-DS VM. The build results from the previous stage are unarchived and copied to the webroot of the webserver.